HP Hotkey Support Blank Popup
On your HP laptop, are you experiencing the annoying HP Hotkey Support Blank Popup issue? You are not alone, so don’t worry. In this comprehensive guide, we’ll lead you through a step-by-step way to address the issue and get your HP hotkeys back on track.
Recognizing the HP Hotkey Support Blank Popup Problem:
The HP Hotkey Support Blank Popup problem is a widespread issue among HP laptop customers. When attempting to use hotkeys, this problem happens when the hotkey support service encounters errors, resulting in a blank or unresponsive popup.
Common Causes of the Blank Popup Problem:
- Outdated graphics drivers
- Corrupted HP Hotkey Support installation
- Windows updates causing conflicts
- Service-related issues
The 100% Working Solution: Step-by-Step Guide:
1. Disable and Re-enable HP Hotkey Support Service:
1. Go to the “Services” application.

2. Locate “HP Hotkey Support” in the list.
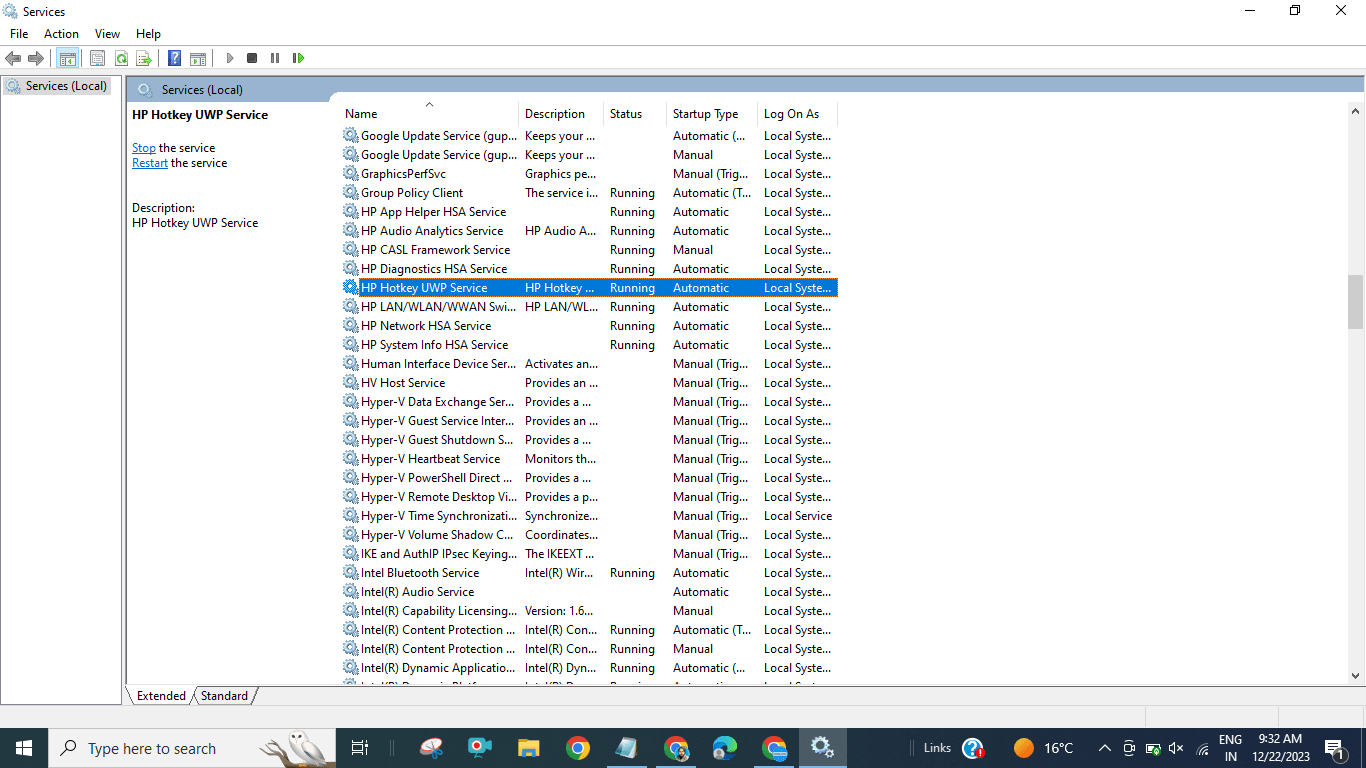
3. Right-click and select “Stop.”
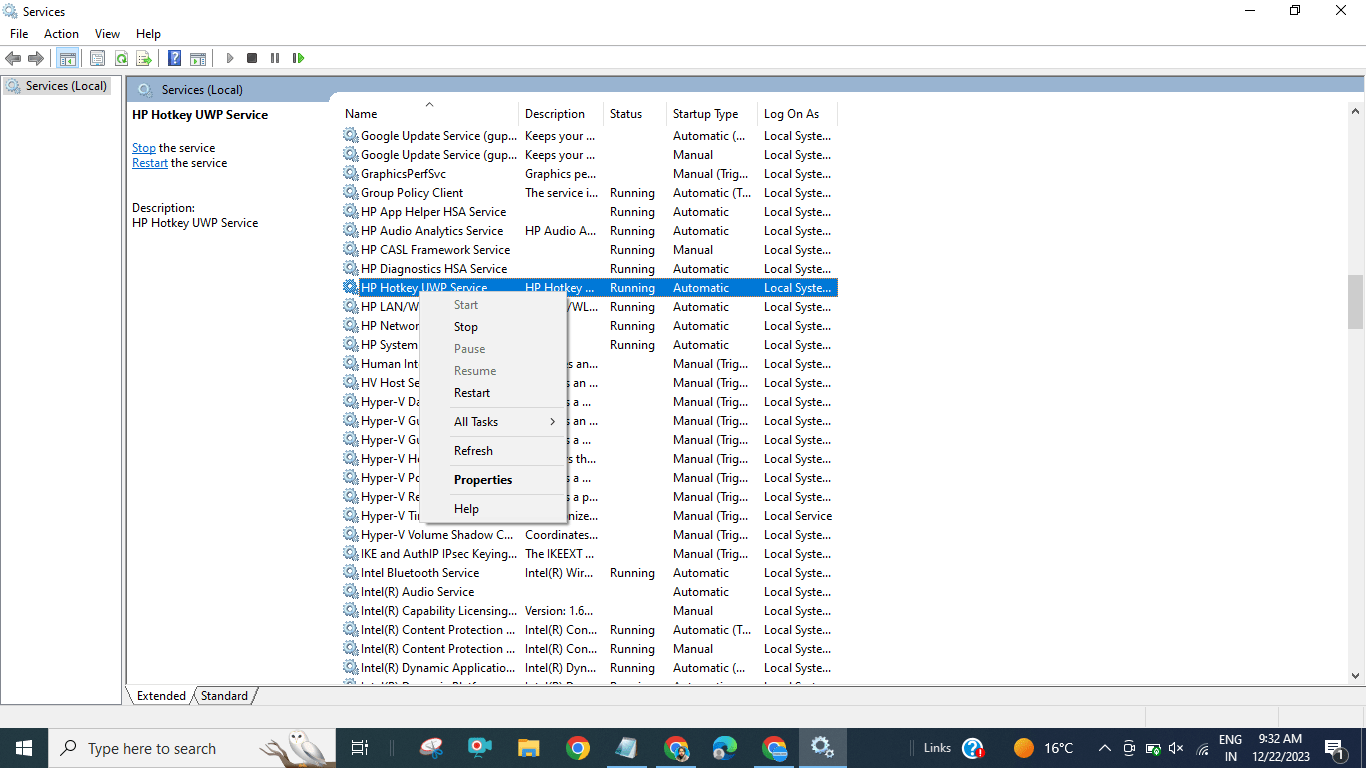
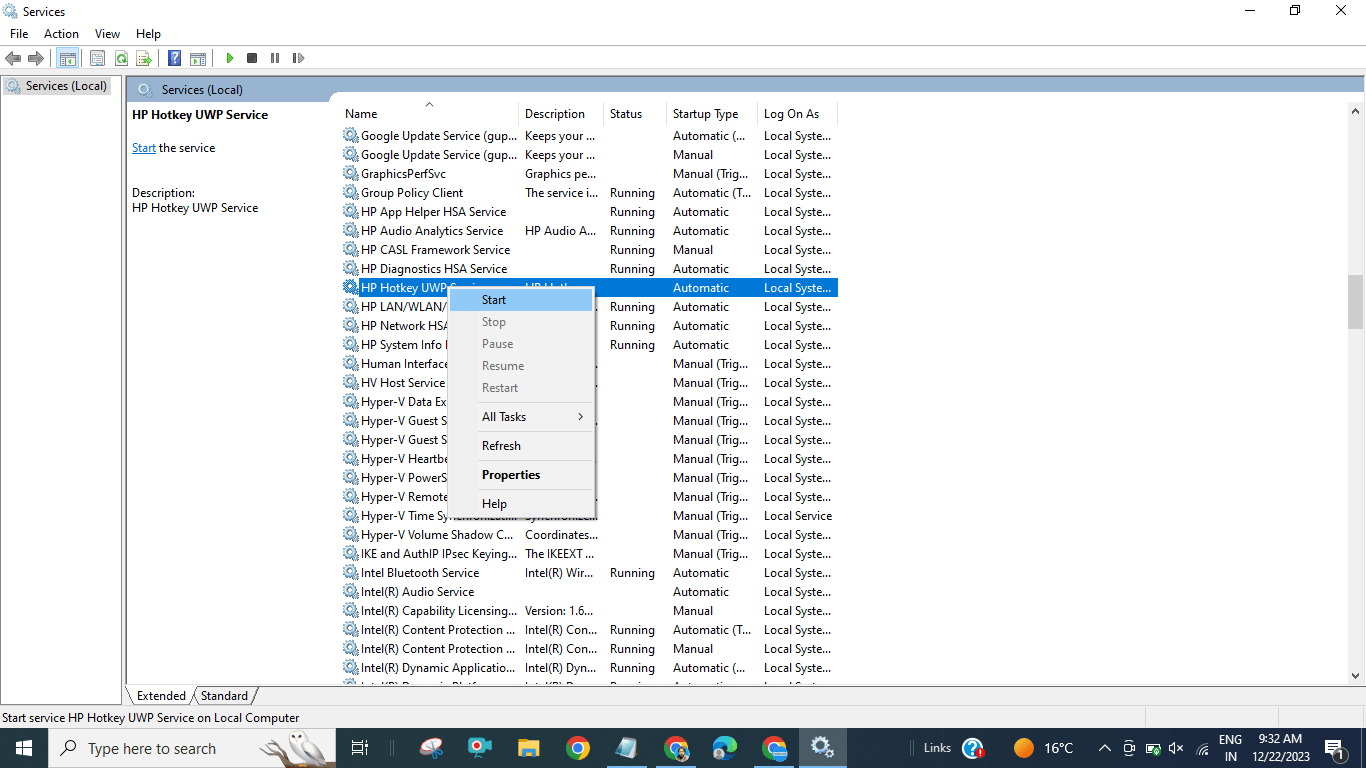
4. After a few seconds, right-click again and select “Start.”
2. Check for Windows Updates:
- Go to Settings > Update & Security.
- Check for updates and install any pending updates.
3. Update Graphics Drivers:
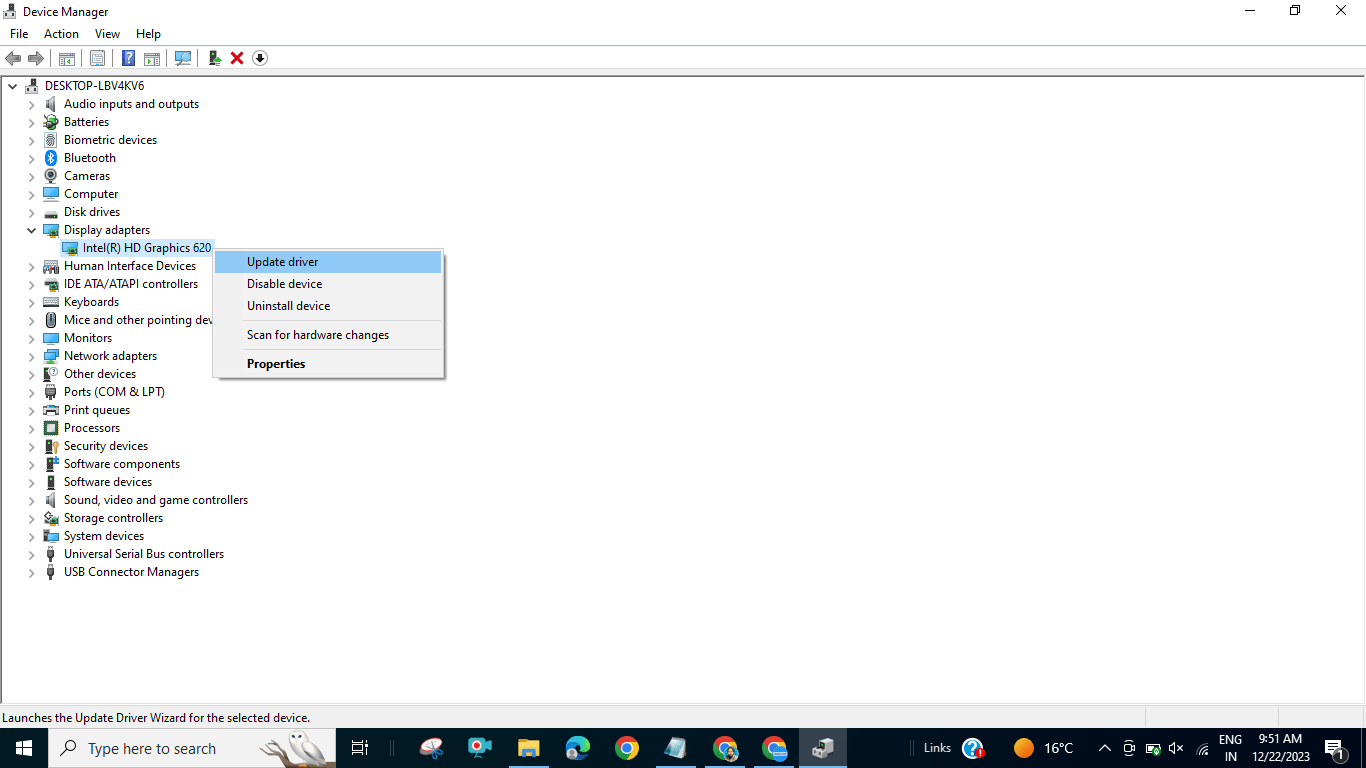
- In the search bar search Device Manager as shown in the figure below and then Open Device Manager.

2. Locate Display adapters and Right-click on your graphics card (it might be labeled as Intel, NVIDIA, AMD, or something similar). Now click update driver as shown in the figure below.
Choose the “Let me pick from a list of available drivers on my computer” option from the provided selections.
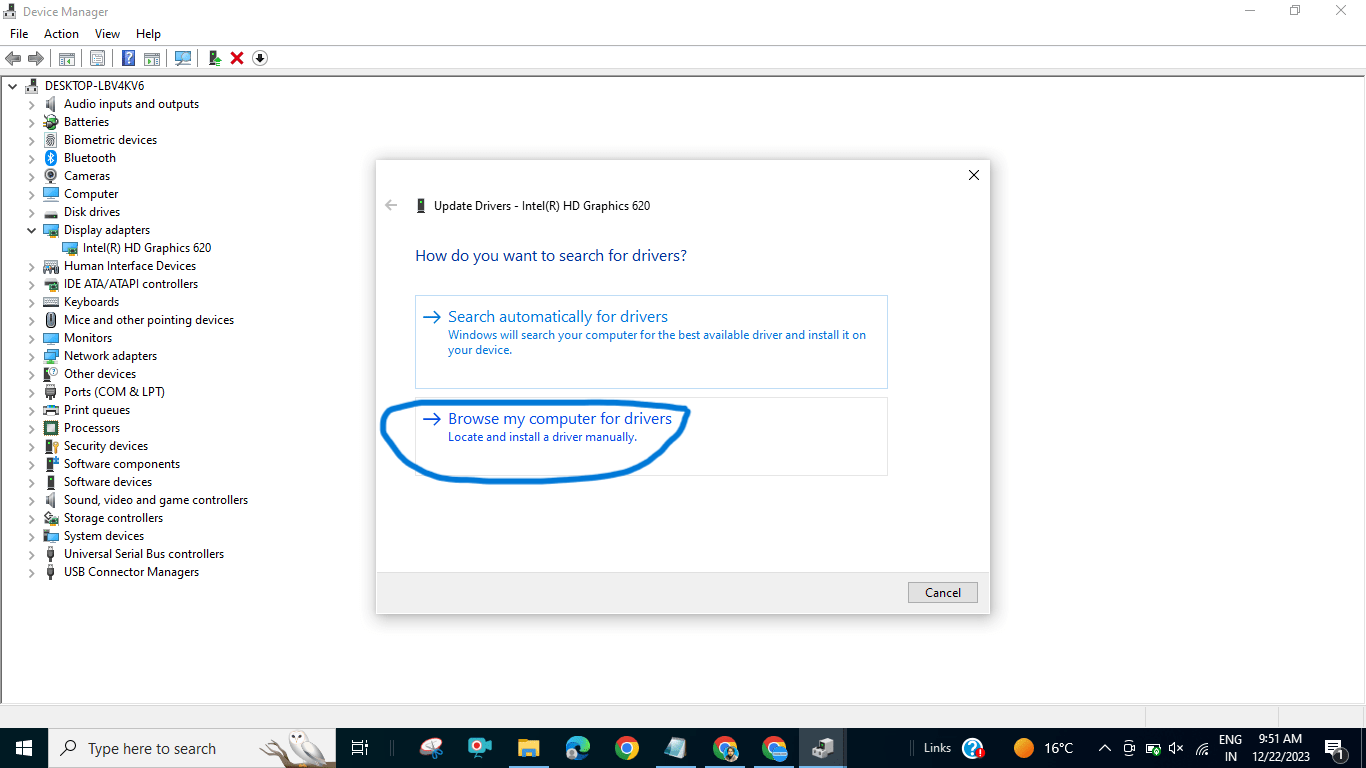
Enable the “Show compatible hardware” checkbox, as shown in the figure below. From the list, opt for the model displayed at the top. For instance, I have chosen “Intel(R) HD Graphics 620.” Select the model that corresponds to your computer, then proceed by clicking “Next.” The installation of the updated drivers will commence upon clicking “Next.”

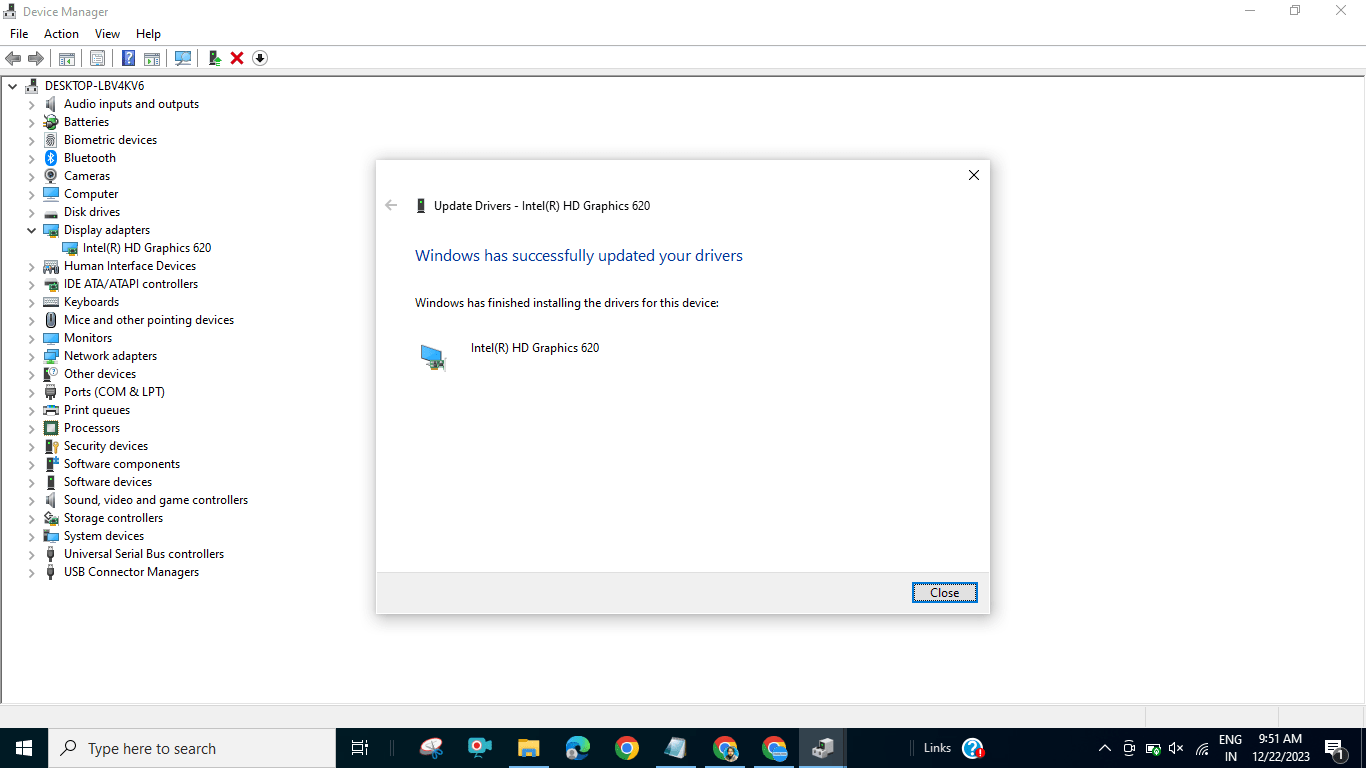
After the installation is complete, restart your computer and check whether HP Hotkey working or not. If the issue still remains then the only option is to install a new HP assistant.
4. Step-by-step instructions to download and install HP Support Assistant:
Video Guide: Installing HP Support Assistant – Step-by-Step Tutorial!
Looking for a visual guide on how to download and install HP Support Assistant? Check out our step-by-step video tutorial on YouTube! Watch the video for a comprehensive walkthrough of the entire process and handy tips.
Open your Web Browser:
Launch your preferred web browser, such as Google Chrome, Mozilla Firefox, or Microsoft Edge.
Visit the HP Support Assistant Download Page:
Go to the official HP Support Assistant download page. You can find it by searching “HP Support Assistant download” in your preferred search engine.
Locate the Download Button:
On the HP Support Assistant download page, locate the download button. It’s usually prominently displayed, and you might see an option like “Download HP Support Assistant” or something similar.
Click on Download:
Click on the download button to initiate the download process. Your browser may ask you to confirm the download, so go ahead and confirm.
Wait for the Download to Complete:
Allow the download to finish. The time required will depend on your internet connection speed.
Run the Installer:
Once the download is complete, locate the downloaded file (usually in your Downloads folder) and double-click on it to run the installer.
User Account Control (UAC) Prompt:
If prompted by User Account Control (UAC), click “Yes” to allow the installer to make changes to your system.
Installation Wizard:
Follow the on-screen instructions provided by the installation wizard. This may involve accepting the terms and conditions, choosing an installation location, and specifying other preferences.
Complete the Installation:
Allow the installation process to complete. This may take a few minutes.
After successfully installing the HP Support Assistant, it is recommended to restart your computer to apply the configured settings.
Video Guide Part 02:
5. Updating HP Hotkey UWP Service: A Step-by-Step Guide
Step 1: Accessing Services
- Navigate to the search box on your computer and initiate a search for “Services.”
- Open the Services application from the search results.
Step 2: Locating HP Hotkey UWP Service
- Within the Services window, locate “HP Hotkey UWP Service.”
- Right-click on “HP Hotkey UWP Service” and select “Properties.”
- In the Properties window, there you will see an option of “Startup Type” select disable, as shown in the figure below.

Step 3: Applying Changes
Once you have made the above changes now click “Apply”. Close everything and now follow the steps mentioned below.
Step 4: Downloading the Updated Driver
- If you get information about the updated driver then visit the official HP website by clicking here.
- Or just Click “Get The Download Link” below to download the recently updated driver from the HP official website.
Step 5: Installation Process
- Install the downloaded driver following the provided installation instructions.
- Ensure to restart your computer once the installation is complete.
By following these steps, you will successfully update the HP Hotkey UWP Service on your system.
- Once you Restart the computer again navigate to the search box on your computer and initiate a search for "Services."
- Within the Services window, locate "HP Hotkey UWP Service."
- Right-click on "HP Hotkey UWP Service" and select "Properties."
- Next to the Startup Type there you will find four options click Automatics as shown in the figures below.
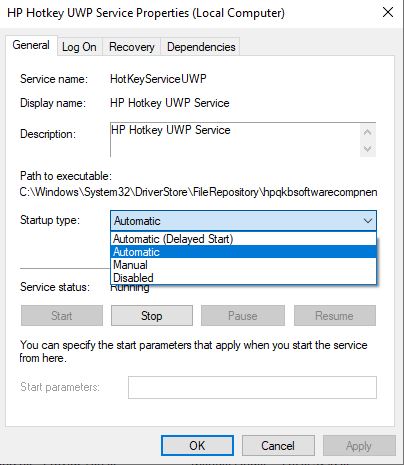
Click Apply and then click OK. Again right click the "HP Hotkey UWP Service" and click Start as shown in the figure below.
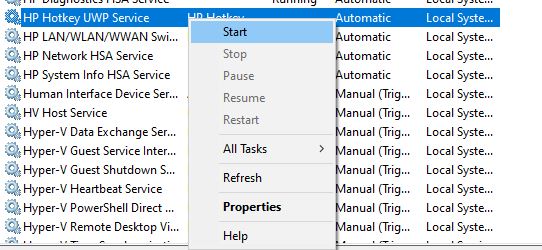
After doing these settings everything will start to work.
Reach Out for Personalized Support
If you encounter any issues despite following the aforementioned steps, please feel free to leave a comment below or reach out to me via Instagram. I will promptly respond to assist you.

